AI coding assistants have advanced from providing smart autocomplete to building complete albeit simple products. This advance has been fuelled by a combination of improvements in model quality and coding-focused training along with new tooling that supports rapid code development.
We’re going to cover the different levels of usage with AI coding assistants and go into detail on the key strategies that developers are using to multiply their productivity with these tools.
We’ll also discuss how context and compute impact results, share practical strategies for teams and point you to sources for more in-depth information.
The Tools – plenty to choose from
There are currently two main categories of coding tools – first generation, IDE based tools like Github Copilot and Cursor that are in a constant race to maintain feature parity with each other while also doing their best to integrate ideas from the second generation of coding tools – the agent-based paradigm spear-headed by Claude Code.
This paradigm is starting to be referred to as Agentic Development Environments (ADE).
There are also browser-based tools like v0, replit, lovable and bolt.new, but we will be sticking to tools that are likely to be used by teams working on substantial, local codebases.
Below is a non-exhaustive table of AI coding tools that we examined while writing this article.
| IDE Based | ADE Based | Open Source |
| GitHub Copilot | Amp | Cline |
Levels of AI Coding Assistant Use
Different tasks and different developers require different approaches to using AI. Sometimes fine-grained control is needed. At other times, for well defined problems and “boilerplate”, an AI coding assistant can shoulder more of the effort.
We’ve broken down the use of coding assistant to 4 levels:
- Autocomplete
- Pair programming
- Feature Lead
- Tech Lead
Autocomplete – Line level AI-assistance
This style of coding assistant usage is good for working in existing codebases and making multiple edits or refactoring. It is a feature of the leading IDE-based tools.
A good AI autocomplete can fill in boilerplate like type information and assist with repetitive code such as mapping values between objects or marshalling and un-marshalling data formats.
It can also predict where your next change needs to be made, allowing you to jump to edit spots. For example, adding a typed argument to a function definition will lead to the required import statement at the top of the file.
For more detailed additions, where some mind-reading would be required, writing a short comment about the next step in the function you’re writing can prime the autocomplete enough for it to provide a first pass you can craft into the form you need.
Implementations
- Cursor’s tab completion was its initial claim to fame. It used a fast, dedicated model to generate completions.
- Cursor was followed by Copilot and Windsurf
- Now AmpCode, an agent-based AI coding assistant, has added a tab completion mode
- File oriented tools like Cline and Roo don’t provide tab completions despite working within an IDE
Pair Programming
The next level up uses IDE-based AI coding assistants like Cursor, Windsurf, Cline, and Roo. It operates at the function level, instructing the AI in writing blocks of code, and makes use of the chat panel of the IDE to instruct the coding assistant and manual edits in the file windows to tweak generated code.
We call this “Pair Programming” because code is written in dialogue with the coding assistant, with the developer moving between prompting in the chat interface and revising code that the AI writes.
Getting the best performance out of the coding assistant requires giving it all the background knowledge about the project, or the particular task you’re working on, that it will need. It will know that if the file is typescript that it has to code in typescript, but it won’t know which libraries you want it to use, or what other APIs/sub-systems it has access to.
The developing standard for providing this information is to use “Rules” files. Coding assistants each have their own file or directory of files where they look for instructions to load into their context at the beginning of a session or a new conversation.
Rules can provide guidance on coding conventions, project structure, library preferences, commands to perform or any other information or action you need.
You can even use the coding assistant to update or write new rules as the opportunity (or problem) arises.
Each coding assistant has its own convention for rules file names and locations. Check the documentation.
Feature Lead
For this level we are defining feature development as anything that involves adding code across multiple files and/or integrating functionality into an existing codebase
This is where coding assistants start to offer a substantial productivity boost. It’s also where programming takes a step up the ladder of abstraction from code to specifications for the code.
Here is a quote from Robert C. Martin in his book “Clean Code” from 17 years ago:
“Indeed some have suggested that we are close to the end of code. That soon all code will be generated instead of written. That programmers simply won’t be needed because business people will generate programs from specifications.
Nonsense! We will never be rid of code, because code represents the details of the requirements. At some level those details cannot be ignored or abstracted; they have to be specified. And specifying requirements in such detail that a machine can execute them is programming. Such a specification is code.”
At this level, typing is no longer the limiting factor on how quickly code can be produced. Instead, clarity of instruction, the specifications given to the coding assistant, and generating those specifications, is what sets the limit.
This has lead to the adoption of a technique sometimes known as “Product Requirements Document Driven Development” (PRDDD). With detailed specifications determining the success in using AI coding assistants, it turns out you can use AI coding assistants to help you write the detailed specifications you need.
The document creation process for PRDDD follows this path:
PRD → Technical Specification → Implementation Plan → Checklists → Task lists
The PRD is created in a discussion with an AI like Gemini Pro, Claude Opus or O3 instructed to ask questions and resolve unknowns and ambiguities by asking you for clarification.
The PRD is used in a similar process to create a Technical Specification from it. Each new document is used to create the next.
It is a common strategy to use a second provider’s model to critique and refine the PRD, technical specification and implementation plan. And of course a senior developer should also review and refine them.
Next, you create as many Checklists as needed. You choose how you break down your project: services, implementation phases, etc. Aim for clarity of purpose. You want a checklist to be dedicated to one clear end.
Checklists are then turned into detailed Task Lists by the coding assistant.
The coding assistant can be prompted to turn an item on a checklist into a detailed task list for a mid-level developer (targeting a junior developer level will create too many steps or be over-simplified).
A detailed walk through of the process is available on specflow.com.
Code then verify
Then it is simply a matter of instructing the coding assistant to complete the items in a task list, marking them off as it goes.
Then, with a cleared context or in a new session, instruct the coding assistant to verify the completion of the tasks.
There are workflow tools that automate opinionated versions of PRDDD:
Claude Simone (Claude Code only)
Claude Taskmaster (All IDE-based tools)
Tech Lead
This level involves working at the application level and leverages Agent Orchestration instead of assistant management.
Agent Orchestration still uses PRDDD but in parallel across multiple agents.
Depending on your coding assistant you will use either in-tool orchestration or manual Orchestration.
Tools with inbuilt orchestration to launch multiple agents (called sub-agents or tasks):
- AmpCode
- Jules
- Cursor (new background agents in beta)
- Claude Code (using the Task tool)
Manual orchestration is built around terminal-based coding assistants like Claude Code and OpenAI Codex. It combines Git Worktrees + tmux to work on multiple features simultaneously. This process works with any terminal based coding assistant.
Its popularity has led to specialised tools for managing manual orchestration:
The Two Practices That Maximise AI Coding
No matter which level of AI coding usage you are working at, there are two key practices you need to get right to get the best results from AI coding assistants are:
- Managing Context
- Burning Compute
Managing Context
AIs are getting longer context windows, but their performance suffers as their context window fills. Managing the context window is currently a key focus of developers using agentic coding tools and the growing awareness of the impact of context window contents on agent performance is causing “prompt engineering” to give way to “context engineering”.
Concise, targeted documentation is needed to leave space for the AI to read code, write its own code into the context, reason about it, make tool calls and perform management tasks. Going overboard on “rules” files can negatively impact the quality of the code an assistant can produce, and how “agentic” it can be.
Until the tools are smart enough to optimise context for you, follow these tips to maximise information while minimising tokens:
- Use diagrams in mermaid format including
- Architecture diagrams
- Sequence diagrams
- State machine diagrams
- Entity-relationship diagrams
- You can get the LLM to “draw” them for you
- Include a file tree for the project
- Use API references for libraries, services and modules(in house and third party) rather than the actual code.
- You can reference specific documents in your prompt (most coding assistants use an @filename command) and provide instructions to read any global documentation in the coding assistant’s rules file.
Use sub-agents/tasks.
Sub-agents act like a fresh context window to complete a task.
- The main agent context will grow by only the sub-agent’s response, maintaining coherency
- The sub-agent will load the same rules files and other default documentation along with any other files or text supplied by the agent.
- You want briefing the sub-agent to be file-based or involve minimal text exchange (like a task list)
- Have the sub-agent make direct changes to files and report back a summary or a success/failure message
- Note: You may need to provide rules on when and how to use sub-agents in your coding assistant’s rules file.
Burning Compute
The more inference time compute an AI uses the better chance the result is correct. Prompt tokens and generated tokens contribute to the compute.
Chain of Thought (CoT), instructing a model to document a thinking process as part of its response, is an example of burning more compute to improve results.
Reasoning models are LLMs that have been trained to generate an intrinsic form of CoT. In Claude Code you can set the thinking budget for Claude Opus or Claude Sonnet to expend on a response using “think”, “think hard”, “think harder”, and “ultrathink” in your prompt text to control how much extra compute you want to use.
Best-of-n is another technique, where the same prompt is run “n” times and best result used. OpenAI’s O1-pro model costs more than O1 because it uses the Best-of-n approach to generate answers, making it “n” times the cost of the default O1 model. They are using the same technique for producing high quality answers from O3-pro. This increased usage of compute also means a longer time to return an answer.
Using Best-of-n smaller models can reach the performance of larger models if given enough compute via multiple runs, but there are limits to this size/compute trade-off.
All this means trying multiple times at a failed task is a reasonable strategy. But make sure you do follow up attempts with a fresh, strategically primed context including what has been tried and didn’t work. You can get the coding assistant to provide that try/fail summary before starting a new conversation.
After 3 failures you should try a model from another provider to solve the issue or to get insight on the failure.
Burning Compute & PRDDD
PRDDD uses iterative decomposition of your goals to cache compute.
Using AI to break down a task into small steps, each supported by a detailed prompt of system and process documentation, leverages the earlier compute that created the documentation.
Inference over a detailed prompt for even a simple task gives you the best chance of success by maximising compute. But you need to be sure that there is enough headroom in the agent’s context for the detailed prompt along with the agent’s thinking, tool responses and file changes in order to get the best results.
Everyone wants to use less compute to save money, but using more compute can get you single-shot success instead of burning more compute (and time) iterating over poorly (cheaply) specified tasks.
Starting a fresh session and instructing the coding assistant to verify tasks it has completed spends more compute while using a shorter context providing better coherence and better outcomes.
First you do it, then you do it right
This is a technique that builds on the idea of burning compute as well as the old engineering adage: “First you do it, then you do it right, then you do it fast”.
Start your code change in a new branch. First use the agent to make a plan for the executing the change. Have the agent maintain an append-only log where it records files used, decisions made, the questions it comes up with, the answer to those questions and any surprises while it executes the plan. Once the coding task is completed commit it and close the branch. Then have the agent review the diff and update the plan with any insights. Finally, roll back to before the branch and then re-run the code change with the updated plan and the log to guide the agent in a second run through.
Practices for Teams
- Partition your codebase
- Modularity with strong decoupling and clear interfaces between services is key to multiple team members using AI coding assistants
- Modularity also decreases the size of the context needed to hold relevant information
- Limit the coding assistant’s reach to targeted folders
- Have clearly documented standards that are used across all coding assistant sessions
- Have a place to share prompts, rules files, and processes across the team
- Make use of tools like SpecStory for capturing coding sessions to extract prompts and coding strategies
- Have clear boundaries on what coding assistants can and cannot touch. These are places where any breakages could have negative business impacts.
- APIs
- Data migrations
- Configuration scripts
- Tests
Worth Reading
The sources below cover the current status quo in best practices for using AI coding assistants as of June 2025. They are worth reading. The AI High Signal list on Twitter is a good place to watch for the emergence of new techniques and tools and the AI News newsletter delivers daily summaries of trending topics.
- Revenge of the junior developer
- My AI Skeptic Friends Are All Nuts
- Beyond Code-Centric: Agents Code but the Problem of Clear Specification Remains
- Specflow
- Vibe Coding 101 for Software Engineers
- Field Notes From Shipping Real Code With Claude
- You are using Cursor AI incorrectly
- The Agentic Systems Series
- How to fix your context
- The Prompt Engineering Playbook for Programmers
- My AI Prompt Engineering Playbook for Developers
- A 3-step AI coding workflow for solo founders
- LLM Codegen go Brrr – Parallelization with Git Worktrees and Tmux
- Field notes: git worktree pattern
- Claude Code: Best practices for agentic coding
- AI High Signal list on Twitter
- AI News newsletter
“Agentic” coding tools are the new hot AI-wrapper product. They seem to promise that they will make your developers super-humanly productive by turning them into managers delegating and approving the work of as many AI coding assistants as you can afford.
They are also spoken of as the next step in the evolution of programming. As we went from filling memory by flipping switches to manually punching cards to encode machine instructions then on to assembly language and from there to structured programming languages that required a compiler to generate machine code, now we will all be programming in English (or your preferred human language) via conversation with AI.
This new conversational style of “programming” is also causing people to predict the end of the IDE as the new agentic coding tools do away with or simplify text editors as part of their feature set.
Cursor was the editor with built-in AI. Now you have tools like Factory and Jules that reduce the editor to a minimal box where you can make basic changes if you really must. If you have a problem with your agentic AI assistant’s code, or if you just want to explore what they’ve written, you’ll need to tab away to your old IDE.
AI-assisted coding is the second killer app after ChatGPT (which took just 2 months to reach 100 million users) and model providers are leaning in hard to capture this market, shifting the training of their models to emphasise coding ability and coding processes.
And on the product side, the industry saw the valuations of Cursor and the purchase price of WindSurf and started pumping out their own variations and visions for the future of AI-assisted coding.
Below we run you through the main contenders for agentic coding assistants. “Agentic” is slowly gravitating towards meaning multi-agent systems performing multiple (if not hundreds) of actions on their own to complete a task. Coding assistants are all heading that way. Having many agents doing focused tasks and expending higher levels of compute is a clear strategy for getting better results out of AI.
But these coding tools are mainly single agent assistants and “agentic” here means that the coding assistant will decide what to do itself across many, even hundreds, of actions.
Some developers simply run multiple instances of these single agent assistants simultaneously. Here is the CPO of Anthropic, makers of Claude, explaining that this is exactly what happens in Anthropic, where developers have become “orchestrators” of Claude, and yes, that is going to impact hiring practices.
The Agentic Coding Tools
Claude Code

The first widely used agentic coding assistant, Claude Code was released in 2025. Anyone who has been closely following the tech for more than a year will recognise the influence of the open source AI coding tool aider. Claude Code took the terminal-based, conversational model and added MCP-based tool calling, giving the assistant more actions to perform, including interacting with files, searching the web for solutions, pushing changes to your git repository and anything else you wanted to wire it up to.
If you wanted to look at the code you had to switch to your IDE. For VS Code and the like you could choose to run Claude in a terminal window and watch it work while giving it directions.
Running multiple instances of Claude Code in a terminal using a session manager like tmux became a power move for developers who could afford the expense of all the tokens. This practice was codified in tools like Claude Squad.
Devin
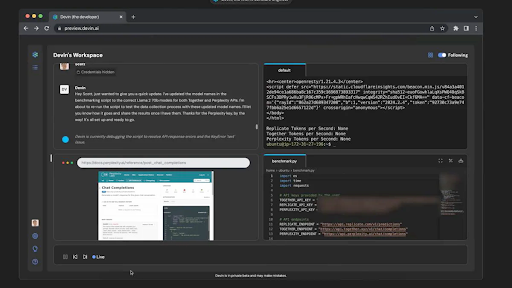
Devin made a splash when it was announced in March 2024. Its big selling point was that it was built by a team of competitive coders, who obviously must know a thing or two about software development. Unlike Claude Code, which anyone who could be bothered to sign up for an Anthropic API key could access on a PAYG basis, it was infamous for being expensive and hard to get access to. It became generally available in December 2024.
With the release of Claude Code in the following February, which gave developers a new sense of just how expensive coding can be when every action can consume 100K+ tokens, Devin no longer seemed over-priced.
Devin has an in-house fine-tuned model for code generation. It also uses dedicated agents for different purposes (editing files, interacting with the command line, etc) that can interact with each other to get things done.
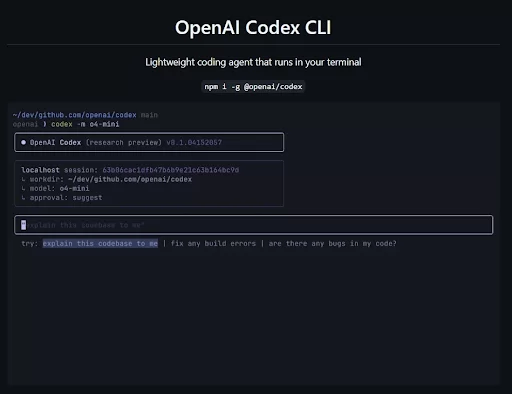
In May 2025 OpenAI announced Codex, their own dedicated AI coding assistant running on their models. Codex is cloud-based and can work with your repositories. It is only available in ChatGPT Pro and ChatGPT for Teams.
At the same time OpenAI also announced Codex CLI, an open source Claude Code clone that the community quickly updated to make it work with other model providers and inference services.
Jules
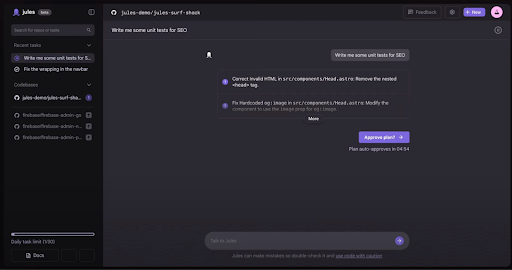
Google announced Jules, their cloud-based coding assistant at Google I/O in May 2025. It is powered by their SOTA Gemini models.
Jules can connect to your repositories and it uses a notion of “tasks” to allow you to direct it to work on several things at once. It is still in early beta and provides 60 actions per day for you to try it out.
AmpCode
AmpCode looked at how developers were using Claude Code, especially developers running multiple instances of Claude Code to do more at once, and built an interface around that idea. They extended it, calling multiple instances “Threads” and making it team based, so everyone involved can see what is being worked on. They recently let the agents in a Thread spawn sub-agents that can run in parallel.
AmpCode is available as a VS Code plugin and as a node-based CLI tool.
Factory
Factory is the latest AI coding tool to come out of stealth mode. It is a browser-based tool, like Jules, but unlike it Jules it also has a “bridge” app that runs on your machine, allowing it to access local files and the command line.
Factory uses the idea of “Droids”, which are each a specialised collection of prompts and tools. There are Knowledge, Product, Code and Reliability Droids.
The idea with Factory is that you have multiple sessions running, each in its own browser tab or window, each using a particular type of Droid to perform tasks.
With the right tool permissions, Droids can update your local or Github repositories directly. And the interface lets you work as a designer and code reviewer instead of a programmer. You will want to pop out to your IDE opened in your repository if you want to explore any changes or make your own fixes.
Different Interfaces But Same Models
Each of the tools we’ve covered has their own take on how AI-based coding is going to be performed. Some are more different than others, but we are in the early, exploratory stage of this paradigm.
In trialing these tools for this article (except for Devin) one thing was obvious: no tool is magical. They all feel the same and that is because they are all built on top of the same 3 model providers.
The SOTA models are all pretty close together in the evals. No bespoke interface, despite any lengthy, heavily tweaked prompts, is going to extract better code out of the models than any other product.
Pick Your Coding Assistant
The only way to get better code out of a model is more compute – more tokens, more context, more runs at the same task. It is pay-to-win, but with open source tools like Cline and less expensive, high ability coding models like DeepSeek, you do have cheaper options.
An effective coding assistant does more than just generate code, it also performs actions. There are differences in models’ abilities to choose, execute and respond to actions, with Claude being the leader in this regard, but it is a feature all model providers are training for so you can expect the gaps to close in the near future.
With models matching on quality, and tools racing for feature parity, and everyone competing for your $$$, it’s a good time to be trialling tools and seeing what works best for your team.
Your AI coding strategies can be transplanted from one tool to another. Their output is raw code in your repositories, so there is no lock-in.
Coding is going to be AI-assisted. There is no avoiding it. Start working with the tools now so your team can evolve alongside the technology and not be left behind.
How to Use Permissions To Minimise the Damage When Your Security is BreachedYou have security measures in place, right? We made a guide to the basic security practices everyone should have in place. So let’s say you’ve got the basics down. Nothing is perfect and cybercriminals have that automated relentlessness. So what happens when one of your security measures fails?
Yes, we say when, not if.
What if someone clicks a phishing link and gets hit with malware or even an old-fashioned disgruntled employee decides to cause problems for you?
The damage depends on what they can access. That’s where permission management comes in. This article walks you through how to limit the blast radius of a security incident using access controls, segmented data, and a few smart defaults. It works across your devices, your shared storage, your intranet and team services like Google Workspace and Microsoft 365/Teams.
Let’s get started.
1. Start With Stopping Admin Rights Everywhere
No one should be a local administrator on their machine unless they need to be. This one change makes a huge difference.
Why it matters
If malware gets in through email or a bad download and the user has admin rights, it can install more malware, mess with system settings, or move sideways to other systems. Remove admin rights, and a lot of that just doesn’t work.
If someone does need administration privileges, they should be working in standard user mode except when administration privileges are required.
What to do
- Set up all company laptops and desktops with standard user accounts.
- If someone needs admin rights (e.g., IT), create a separate admin account for them to use only when necessary.
- Use MDM tools (Google endpoint management, Microsoft Intune, Jamf, etc.) to enforce this and push out settings.
Add-on: EDR + Updates
EDR is basically permissions for apps. It stops apps from doing things they shouldn’t.
- Install and manage an EDR (Endpoint Detection and Response) tool on all devices (Microsoft Defender for Business, ESET Endpoint Security, Trend Micro Apex One, Sophos Intercept X, CrowdStrike Falcon).
- Enforce automatic updates for OS and key apps.
- Encrypt drives (BitLocker for Windows, FileVault for macOS) and enable device wipe for lost/stolen gear.
2. Be Selfish With Shared Storage
The goal here is simple: if someone breaks into one account, how many files can they touch? With bad storage hygiene, the answer might be all of them.
Where it goes wrong
Shared folders are always popping up as new projects start or new processes appear. People are added or, just to make it easy, everyone in the org can access them.
Most of the time these permissions are never reviewed or tightened.
What to do
- Segment storage by team or project. No more giant “shared” folder for the whole company.
- In Google Workspace: use Shared Drives instead of individual Drives. That way, when someone leaves, the files stay.
- In Microsoft 365/Teams: use Teams-based document libraries for file access rather than shared folders in OneDrive.
- Turn off or restrict “Anyone with the link” sharing.
Run permission reviews
- Every quarter (or every big org change), check: who has access to what?
- Remove people from folders, Teams, Drives they no longer need.
- If someone leaves the company, remove them from all groups and shut down access the same day.
External sharing
You want to avoid this where you can, but in a world of contractors and consultants sometimes you need to give outsiders access. Just be sure to give them as little access as possible.
- Use approved domains in Google Workspace.
- In Microsoft 365, restrict guest access with policies.
- Set links to expire or restrict them to specific people.
3. Use a “Need To Access” mindset
Just because someone is part of your business doesn’t mean they should need access to everything. Or, to be more serious, use a “Zero Trust” model. No-one gets access to anything unless they provably need it.
Segment Information and Functionality
- Finance doesn’t need access to Engineering’s wiki.
- Engineering doesn’t need access to HR’s files.
- A contractor doesn’t need access to your Slack history.
Use groups and roles to manage access:
- In Google Workspace, assign access to Sites, Docs, and Calendars based on Groups.
- In Microsoft Teams, create private channels for sensitive conversations (e.g., leadership, HR, finance).
Use conditional access policies
- Only allow access to critical apps from managed devices.
- Block logins from unknown IPs or suspicious locations.
- Require re-authentication or step-up MFA for sensitive actions.
These policies exist in both Google and Microsoft ecosystems. Use them.
4. Use MFA & Password Managers For Everything All The Time
MFA
This is non-negotiable. This shifts account permissions, limiting them to the individual with the MFA key.
Every account should require Multi-Factor Authentication (MFA). Without it, a phished password is compromised service. With it, a phished password is still blocked at login.
Enable MFA for all Google Workspace or Microsoft 365 accounts. If you’re not already doing this, stop reading and go do it.
You will need to install an app. Google Authenticator is available on Android and IOS. Microsoft Authenticator is also available on Android and IOS. They are easy to use. Add a new MFA login is normally as simple as scanning a QR code (never scan random QR codes).
Password Managers
Shared passwords are a liability. Simple passwords that are easy to remember are also a liability, If you must share access to a service rather than providing individual accounts, use a business password manager.
There are good options in this segment. Get your team onto one of these:
Use group vaults, share credentials securely, and train your team to never email or message passwords.
5. Lockdown Internal Apps and Collaboration Tools
The last thing you want is an attacker getting access to internal apps, wikis, or, especially, chat platforms. Staff should only have permissions to access the chats on a need-to-have basis.
What to lock down
- Google Chat rooms: make sensitive ones private, control invites.
- Slack: use private channels, restrict integrations, disable public link sharing.
- Teams: use private channels, restrict who can create them, review membership regularly.
Review OAuth app access
Both Google and Microsoft platforms let third-party apps request broad access to user data. Audit those permissions and revoke what’s not needed.
Here’s how to review OAuth app access on Google Workspace. And here’s how to review OAuth app access on Teams.
Putting It All Together
Here’s the order of operations for getting all the permissions in place:
- Remove local admin rights.
- Enforce MFA.
- Centralise access to shared files, use team-based permissions.
- Review permissions regularly.
- Use private channels/rooms in chat and collaboration tools.
The less access people have by default, the less there is to clean up when something goes wrong. And if you set it all up right, cleaning up becomes: turn off access, restore files, and get on with your day.
That’s the real benefit of this approach. Not just damage prevention, but fast recovery.
That’s all there is. Go limit that blast radius.
Start with devices. Move on to storage. Then wrap up with internal systems. And finally, stop shared passwords and enforce MFA across the board.
Each step is simple. The result is a business that’s hard to hurt, and quick to bounce back if it ever is.
Cybersecurity is getting crazy. AI, automation and cryptocurrencies have combined to reduce the size a business needs to be in order to be profitable to attack.
Generally the attack takes the form of ransomware. Attackers find a way to isolate important databases or file stores and encrypt them. Make a transfer of a large sum of Monero to a drop wallet and they will decrypt it for you.
For almost all businesses their databases and file stores are in the cloud, protected by the large dedicated security teams of Amazon, CloudFlare, Google, Microsoft, etc. This means the weakest link is the access to those databases and file stores.
Your business premises and your staff are the hackers’ easiest avenue to gain access, so that’s where they focus their efforts and that’s why you require a multi-layer security strategy for protection.
Not everyone can afford a full-time security team or coverage from enterprise security vendors, but everyone can implement the basic must-haves for cybersecurity to reduce their risk while they find a cyber insurance provider.
What follows is a standard layered approach to security, starting with internet access and ending with your staff’s minds. If you’re missing any of these, make it a priority to put them in place.
Secure The Network Perimeter
Your connection to the internet. What traffic is coming and what traffic is getting out.
What you need to do: Install a Network Firewall.
In this day and age we all know what a firewall is, right? Most modem/routers have a basic one. It will block automated vulnerability scans and other network attack vectors from the outside, and give you control over how machines inside your network can access external services. Handy if a machine does get compromised.
Business-grade routers with integrated firewall capabilities are available from vendors such as Ubiquiti (UniFi Security Gateway) , or entry-level appliances from security-focused vendors like Fortinet (FortiGate) and Sophos (XG Firewall)
Secure Your Local Network Access
This layer concerns how users and devices connect to your internal network, primarily via Wi-Fi.
What you need to do: Implement Secure Wireless Network Configurations.
This is straightforward:
- use WPA3 (or at least WPA2-AES) encryption,
- disable WiFi Protected Setup (WPS),
- change the default administrator password, and
- implement a separate, isolated guest WiFi network
Most business-grade Wi-Fi access points and routers from vendors like Ubiquiti, Cisco, TP-Link (Omada series), and Netgear (Business series) support these features.
Secure Your Devices and Software
This is the desktop/laptop/phone layer. Because these are complicated and vulnerable out of the box there are 6 things you need to do to secure these “endpoints”.
1. Keep Software Updated
Turn on automatic updates on all your machines and leave it on. Yes, it will occasionally be annoying as an update occurs when you have better things to do, but those annoyances will never add up to the amount of time and money a cyber attack will cost.
Microsoft has Windows Update for Business for OS updates. Microsoft Intune can provide more comprehensive update management across devices and some third-party applications.
Apple sends out security updates regularly. You can set your Apple devices to automatically apply security updates while keeping OS updates manual
2. Use Endpoint Protection Software.
This is your virus scanner/malware detector like CrowdStrike Falcon. You run these because vulnerabilities (“0-days”) can happen at any time and who knows if visiting a website or opening an email has compromised a machine.
Endpoint protection software notices when file or network requests suddenly appear from a new program or an existing program seems to be behaving differently, likely trying to scan ports on other machines in the network.
They do create processing overhead and their scanning can get in the way, but what can you do? Leave yourself wide open?
Windows has Microsoft Defender (built into Windows), with additional threat and management capabilities in its Microsoft Defender for Business. There are also third party solutions such as ESET Endpoint Security, Trend Micro Apex One, Sophos Intercept X, and, as mentioned earlier because of its famous fumble, CrowdStrike Falcon.
3. Enable Per-device Firewalls.
This helps in the situation where you end up with a compromised device on your network. There is probably no good reason for Machine A to be connecting to Machine B on your intranet. All shared resources are in the cloud, right?
Using an on-device firewall to block traffic from local machines, and also report when blocking events occur, protects your intranet from a compromise spreading.
Firewalls are part of most endpoint security suites, and Microsoft Defender also offers basic firewall functionality.
4. Use device encryption, at the very least on laptops
It is unlikely a “hacker” will break into your business to steal a computer with data on it. If you face that level of threat you’re probably not even reading this article.
Laptops, being out in the world, have a higher chance of being stolen. They can also be accidentally left behind.
Encrypting hard drives so that the data can’t be read without a password or key is the solution to this.
Microsoft has BitLocker Drive Encryption for this, and recovery keys can be managed via Microsoft Intune if you’re worried about getting locked out. Apple has FileVault for hard drive encryption, while Google’s ChromeOS devices are encrypted by default.
5. Enforce the Principle of Least Privilege
This is simply granting users only the minimum system permissions they need to fulfil their role functions on the machine(s) they use.
The basic move is not giving admin accounts to users. If they don’t have full access over the machine, any code run during one of their sessions doesn’t have full access either. This limits the damage that a compromised account can cause.
6. Establish Basic Mobile Device Security for Accessing Company Data
This is for phones and tablets, whether they’re company-owned or personal (BYOD). It means making sure everyone is using strong passcodes or biometric authentication, device operating systems are kept up-to-date, application installs are monitored, and a VPN is used when connecting to public Wi-Fi networks.
All major providers offer Mobile Device Management (MDM) and Mobile Application Management (MAM) solutions. Here are links to Apple, Microsoft, and Google MDM solutions.
Secure Access to Applications and Services
This layer focuses on how users access your business applications and cloud services, and that is via passwords. Passwords scribbled on post-it notes are not going to work in a team environment, plus you can’t copy and paste (yeah, yeah, you can with your phone…).
What you need to do: Implement password managers and add multi-factor authentication.
For password managers, it’s straightforward:
- Deploy a team-based password manager solution across your business
- Mandate its use across all services
- Share credentials securely between team members when needed
- Ensure employees can access passwords across all their devices
For multi-factor authentication (MFA):
- Enable it everywhere you can, but especially for cloud providers, email and financial applications
- Only use authenticator apps or security keys.
- Never use MFA via SMS.
- Make it mandatory for all users
Team-based solutions include 1Password Business and Bitwarden Teams. For MFA, Google and Microsoft have apps plus Microsoft offers Microsoft Entra multifactor authentication with their Microsoft 365 plans.
Strengthen Your Human Defenses
This layer acknowledges that your employees play a key role in how secure your business is. You might think you can’t install software on them, but that’s exactly what training does.
Most of the threats are going to come in via email, but in this age of easy deepfakes, phone calls and video calls are also vectors.
What you need to do: Train your staff and protect your email.
For training:
- Run regular cybersecurity awareness sessions
- Teach employees to recognise phishing and social engineering attempts
- Create a culture where reporting suspicious activities is encouraged
- Consider establishing verification pass phrases that employees can use to confirm identities during calls if security or finances are involved. So old-fashioned. But it’s also our future.
For email protection, the major providers, Microsoft and Google, actively scan all email, but they can’t catch everything. But that’s why you have endpoint protection in place.
Protection and Recovery of Business Data
This layer ensures your essential data stays safe and can be restored if needed. You need backups. You need proof you can restore from those backups in a reasonable amount of time at any moment.
What you need to do: Set up regular backups, practice restoring
For backups:
- Follow the 3-2-1 rule: three copies, two different storage types, one off-site
- Test your backups regularly to make sure they can be restored
- Keep backups separate from your main network to protect from ransomware
- Make sure all your backup systems are protected by MFA.
Microsoft offers Microsoft 365 Backup and Purview Data Loss Prevention. Google provides Data Loss Prevention for Google Workspace. For comprehensive backup solutions, consider Veeam Backup or Backblaze Business Backup.
Establish Basic Security Governance and Response
This layer involves having plans in place for possible incidents. If your security does fail, you want to be able to move quickly and minimise disruptions,
What you need to do: Create and document your incident response plan.
For incident response:
- Create a plan for what to do when security incidents occur
- Identify key contacts and detail the steps to take
- Practice the plan occasionally (even just a quarterly walk through around a table) so everyone knows their role
Microsoft provides security guidance documentation and Purview Compliance Manager. Google offers best practice security recommendations for Google Workspace.
Security is a lot, isn’t it?
This “basic” list probably already feels overwhelming. You may have simply scrolled all the way down here just to see if it was really worth reading.
It is a long list, but if you look through it, mainly it is about making a decision and implementing it. Then it’s just monitoring and checking in on it every quarter. And never trusting an email or incoming Zoom call ever again.
Because keeping your business safe requires constant vigilance and the software tools to enhance it.
A Hack to Reduce Your Developers’ Admin Using AI Coding AssistantsIt’s well known that a surprisingly small portion of a developer’s work week is dedicated coding. Big chunks of their time is dedicated to administrative tasks like refining user stories, managing epics, detailing acceptance criteria, and all the other work that happens around the coding.
This administrative load reduces the time available for core development work, limiting how fast your team can move.
However, the same models that power AI coding assistants like Cursor, GitHub Copilot, and Windsurf AI are the same models you use in Claude or ChatGPT or Google Gemini.
This means the AI coding assistants can be used for more than just writing code.
By employing the right tooling and practices, AI can potentially cut down the time spent on writing, reviewing, and synchronising epics, stories, and acceptance criteria by a significant margin.
Leveraging AI for More Than Code
AI coding assistants can be used to reduce the administrative overhead that consumes developers’ time without requiring them to swap to a different app or a browser.
It can all be done directly within the IDE. Cursor and Windsurf AI allow developers to create “rules” – documents that instruct the AI on how to complete specific tasks. While they were intended to provide task-dependent context and guidance to the coding assistant, these rules can also be used to provide context and guidance in generating drafts and revisions of project and sprint documentation, user stories, and other essential agile artefacts.
Streamlining Workflows with MCP and Project Management Integration
The coding agents within these AI-powered IDEs can also be connected to popular project management tools like Jira and Linear through the Model Context Protocol (MCP).
MCP is an open standard designed to enable two-way communication between AI applications and external data sources or tools. This protocol allows AI assistants to pull information from these project management systems and even push updates like new tickets or status changes, further automating administrative tasks.
This integration means that an AI assistant, guided by predefined rules and connected via MCP, can:
- Draft a user story based on a brief description.
- Populate relevant fields in a Jira or Linear ticket.
- Update the status of tasks based on development progress.
- Flag inconsistencies or dependencies between different user stories or epics.
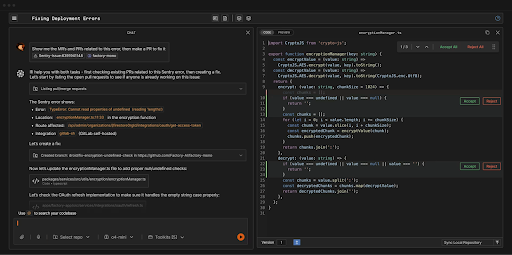
Example: Cursor Rule for Drafting a User Story
AI coding assistants like Cursor use rule files (for Cursor, .mdc files in a .cursor/rules directory, where .mdc is just Markdown with Cursor-specific metadata in the header) to guide the AI’s behaviour. These rules can define the AI’s persona, its understanding of project-specific conventions, and the desired output format for various tasks.
Here’s a very short, conceptual example of what a Cursor rule file for drafting a user story might look like:
---
description: "User Story Generation Rule"
globs:
alwaysApply: false
---
You are an expert Agile Business Analyst. Your role is to help draft clear, concise, and actionable user stories.

### User Story Structure:

When asked to draft a user story, follow this format:

**As a** [type of user],
**I want to** [perform an action],
**So that** [I can achieve a goal/benefit].
### Clarification:

If the request to draft a user story does not include details about the user or action or benefit stop and ask for clarification on the user type, desired action, or intended benefit before drafting the story. Only the user can decide what the user story is about.
### Acceptance Criteria:

For each user story, also draft a preliminary list of acceptance criteria. Start with at least three criteria.

- Acceptance Criterion 1:
- Acceptance Criterion 2:
- Acceptance Criterion 3:

### Task Generation:

Suggest 2-3 initial development tasks that would be required to implement this user story.
- Task 1:
- Task 2:

### Final Step:
Follow the user's instructions for any requested changes. After each change ask the user if the User Story is complete. If they confirm it is complete, use the Jira MCP server to add the User Story to the current project.
This rules file instructs the AI on the standard user story format, the need for acceptance criteria and related tasks. It has a final step that instructs the AI to use a Jira tool to add the created user story to the current project.
It doesn’t make up the User Story itself. That thinking still needs to be done by the developer who understands the broader context of the project beyond the code. It does however, rely on the AI to generate initial acceptance criteria and tasks. How well these will match your developers’ intentions depends on how well represented your product is in the AI’s training data.
Now, this rules file is just a draft. It will need tweaks to work consistently in your codebase. Use it more as a source of inspiration. What other steps in your process can you automate or streamline using the AI in your team’s coding assistant? And don’t forget that you can use the AI coding assistant to write the rules files for you.
Remember: Your Coding Assistant is an Everything Assistant
For now, the AI under the hood of your coding assistant is a SOTA frontier model that can do more than just code. With the right rules files and attached to the right MCP servers, your coding assistant can do everything any other AI tool can do. All from the one interface. Make the most of it to accelerate your team.
5 Platforms For Optimising Your Agents ComparedSo, you’re looking at building Large Language Model (LLM) agents. With the recent increases in model capability at all sizes, and the feature-rich frameworks available (like LangChain, LlamaIndex, AutoGen, CrewAI, etc.), getting agents up and running is easier than ever.
However, there’s a significant jump from an initial functional prototype to a system that’s reliable, performs consistently well, and executes affordably when running in production.
It turns out, building the agent is the easy part. Making it truly performant is where the real challenges lie.
This article dives into that gap. We’ll look at the common hurdles faced when taking LLM agents into production and explore the essential tools and capabilities needed to overcome them.
Let’s get into it.
Why Agent Performance is Hard
Transitioning an LLM agent from a proof-of-concept to production-ready means tracking and addressing reliability, consistency, cost, and overall quality. Here are some of the key challenges:
- Hallucinations & Accuracy: hallucination poses a significant risk, especially if your application needs high precision. Ensuring factual consistency is crucial but surprisingly hard to guarantee consistently.
- Latency & Scalability: Users expect reasonably fast responses. Agents, particularly those running complex reasoning chains or calling multiple external tools, need to deliver results within acceptable timeframes, even when usage ramps up. A prototype that works fine with a few test requests might be too slow under real production load, or scaling it might become prohibitively expensive.
- Cost Management: LLMs are accessed via APIs charging per token (input and output). These costs can vary based on model, context size, caching and inference provider. You need ways to track costs granularly – maybe per user, per feature, or per agent run – but this often requires specific tooling.
- Prompt Brittleness & Engineering: Getting prompts right is more art than science sometimes. Crafting prompts that consistently guide the LLM to the desired behaviour is an iterative and often difficult process. Keeping these prompts effective as models update or requirements shift adds another layer of maintenance overhead.
- Context Window Limitations: LLMs can only “remember” a certain amount of information from the current interaction (their context window). In long conversations or complex tasks requiring information recall over many steps, they can forget earlier instructions or details, limiting their effectiveness. A long context window that might make an agent performant, will also make it more expensive to run.
- Complex Planning & Error Handling: Agents can struggle with tasks needing sophisticated multi-step planning. If an Agent can get each step right 90% of the time, if your process has 6 steps you’ll get a successful result only 60% of the time.
- Data Quality & Bias: The agent’s output is heavily influenced by its training data and any data you feed it at runtime (e.g., via Retrieval-Augmented Generation – RAG). If that data is poorly structured, incomplete, or biased, you risk getting inaccurate results.
- Security & Privacy: Integrating LLM agents brings security considerations. Think about potential data leaks, prompt injection attacks (where users trick the agent with malicious input), and the need to handle sensitive user data securely and comply with regulations like GDPR.
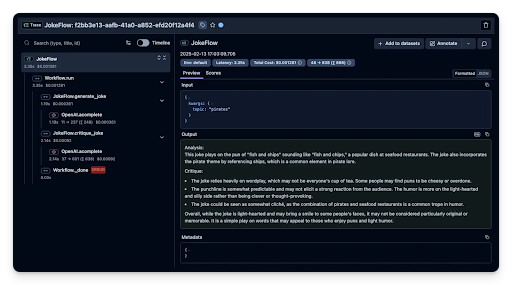
These aren’t just theoretical concerns. Companies like Acxiom, for example, faced difficulties debugging complex multi-agent setups and found they needed platforms like LangSmith to get the visibility required for optimisation and cost management. Research from Anthropic also suggests that simpler, more composable agent designs often prove more successful than highly complex, monolithic ones, highlighting that managing complexity itself is a major challenge. In Acxiom’s case, they were working with 60 LLM calls and over 200k tokens of context to answer a client request.
The challenges in building on top of LLMs are interconnected. Making a prompt more complex to improve accuracy will increase token count, cost, and latency. Simplifying logic to reduce latency might increase errors. Optimisation becomes a balancing act. This is where dedicated tooling becomes essential and you need to move beyond the basics of looking at logs and monitoring API call rates to true observability.
While monitoring tracks known metrics (errors, uptime), observability gives you the tools to understand why your system behaves the way it does, especially when things go wrong unexpectedly. Given the non-deterministic nature and potential for novel failure modes in LLMs, observability is critical for diagnosing issues that simple monitoring might miss.
Key Capabilities for Managing LLM Agents
Observability and evaluation platforms offer a suite of core capabilities designed to help you manage the performance, cost, and reliability of LLM agents.
Each platform has its own strengths and weaknesses, but they all offer variations on the same functionality:
- Monitoring & Tracing: This is foundational. It means capturing detailed records of everything your agent does – tracing the entire execution flow of a request, logging inputs, outputs, intermediate steps (like tool calls), latency for each step, cost, and any errors. Good platforms visualise these traces, making complex workflows easier to understand. For development teams, this detailed tracing is invaluable for debugging. You can quickly find latency bottlenecks, pinpoint where errors occurred in a chain, and see exactly how the agent produced a specific output, saving hours of diagnostic time.
- Cost Tracking & Analysis: With token-based pricing being common, keeping costs under control is vital. These platforms monitor token usage (prompts and completions), calculate costs per API call or session, and let you slice and dice cost data by user, feature, model, etc. Dashboards help spot trends, identify cost spikes, and find optimisation opportunities (like do you try using cheaper models for certain tasks).
- Experimentation & Evaluation: Improving agent performance requires systematic experimentation. Platforms facilitate this with features like A/B testing (comparing prompts, models, parameters side-by-side), automated quality metrics (like BLEU, ROUGE, BERTScore), workflows for collecting human feedback, using another LLM to evaluate outputs (“LLM-as-a-Judge”), and interactive “playgrounds” for quick prompt testing. These tools allow teams to take a data-driven approach, test hypotheses rigorously, validate changes before deploying them, measure performance against benchmarks, and continuously refine agent quality.
- Dataset Management: Good evaluation needs good data. Platforms often include tools to create, manage, and version datasets specifically for evaluating agent performance or even fine-tuning. You might import existing data, generate synthetic data, or – very usefully – create evaluation datasets directly from problematic production traces you identified via monitoring. This lets you build targeted tests based on real-world failures, ensuring your fixes address actual issues.
- Prompt Management (CMS): Prompts are central to agent behavior, but managing them can get messy. Many platforms now offer Prompt Management features, acting like a Content Management System (CMS) for your prompts. This typically includes a central registry, version control, collaboration features, and integrated testing. A key benefit for many teams is the ability to update and deploy prompt changes directly from the platform’s UI, without needing a full application code change or redeployment. This dramatically speeds up the iteration cycle for prompt engineering and can even allow non-technical domain experts to contribute to prompt refinement.
The real value comes from how these capabilities integrate. You might use monitoring to spot a pattern of poor responses, use those traces to create an evaluation dataset, test a new prompt against that dataset using experimentation tools, deploy the winning prompt via the prompt management UI, and then monitor its impact on performance and cost – all within the same platform. This integrated feedback loop is key for continuous improvement.
Of course, platforms vary. Some excel at deep tracing, others have prompt management UIs to allow non-developers to contribute, some come from a broader MLOps background with deep evaluation features, and others focus on simplicity and cost-effectiveness. This means you need to consider your specific needs when choosing.
5 Platforms For Agent Optimisation
Let’s look briefly at five platforms offering relevant observability and evaluation capabilities: Langsmith, Helicone, Weights & Biases (W&B) Weave, Langfuse, and PromptLayer.
Langsmith
Developed by the LangChain team, Langsmith integrates very tightly with the LangChain/LangGraph ecosystem. Its strengths are detailed tracing, debugging, evaluation, and monitoring, especially for complex chains built with LangChain (their core framework available in Python and JavaScript).
It’s a solid choice if your team is heavily invested in LangChain. It offers debugging traces, monitoring dashboards, cost tracking (per trace), a testing/evaluation framework with UI configuration, dataset management (including creation from traces), and a “Prompt Hub” for UI-based prompt management and deployment.
Integration is trivial for LangChain users. Pricing includes a free developer tier and paid plans ($39/user/mo Plus) suitable for small teams, with usage-based costs for extra traces.
Helicone
Helicone positions itself as an open-source observability platform focused on ease of use and cost management. Its standout features are super-simple integration (often just a one-line change via a proxy for your inference provider’s API), strong cost tracking (per user/model, caching), and flexibility (self-hosted or cloud).
It’s great if you prioritise rapid setup, tight cost control, or open-source. It monitors core metrics (latency, usage, cost, TTFT), supports prompt experiments/evaluations (including LLM-as-a-judge via UI), dataset curation, and UI-based prompt editing, versioning and deployment.
Integration via proxy is very fast; SDKs are also available. Pricing is attractive, with a generous free tier, a Pro plan ($20/seat/mo + add-ons for prompt/eval), and a cost-effective Team plan bundling features. The open-source self-hosting option offers maximum control.
Weights & Biases (W&B) Weave
Weave is the LLM component of the established W&B MLOps platform. It leverages W&B’s strengths in experiment tracking, model versioning, and dataset management, extending them to LLMs. It emphasises rigorous evaluation and reproducibility. Best suited for data science/ML teams, especially those already using W&B, needing sophisticated evaluation and MLOps integration.
It offers tracing linked to experiments, cost tracking, a powerful evaluation framework (pipelines, scorers, RAG eval), robust dataset management integrated with evaluation, and SDK/API integrations.
Pricing includes a limited free tier and a Pro plan ($50/mo+) with usage-based costs for data ingestion.
Langfuse
Langfuse is another prominent open-source LLM engineering platform (often seen as a Langsmith alternative) offering tracing, analytics, prompt management, and evaluation.
It appeals to teams wanting open-source flexibility, self-hosting, or broad framework support beyond LangChain.
It provides deep tracing (visualised), session/user tracking, cost tracking, extensive evaluation features (datasets from traces, custom scoring, annotation queues), dataset management, and broad SDK/integration support (including OpenTelemetry).
Its UI prompt management allows no-code deployment via labels (production/staging). Pricing is SME-friendly: a generous free cloud tier, affordable Core ($59/mo) and Pro cloud plans, and the FOSS self-hosting option.
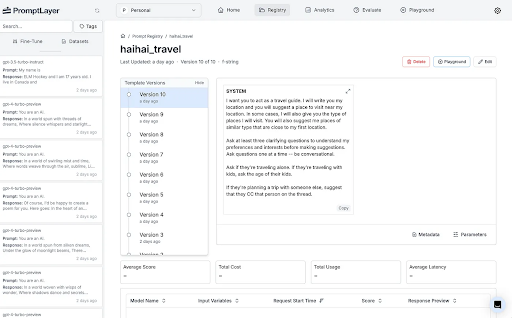
PromptLayer
PromptLayer focuses heavily on the prompt engineering lifecycle: management, versioning, testing, collaboration, and observability, with a strong emphasis on visual tooling (no-code prompt editor, visual workflow builder). Ideal for teams needing rapid prompt iteration, cross-functional collaboration (engineers, PMs, content specialists), and visual development.
It offers request logging, performance dashboards, cost tracking, prompt-centric experimentation (A/B testing, backtesting, human/AI grading), and SDK/API integrations.
Its core strength is the “Prompt Registry” – a visual CMS allowing no-code prompt editing, versioning, and importantly, UI-driven deployment decoupled from code releases. Pricing includes a limited free tier and a Pro plan ($50/user/mo) with a high request limit.
Comparing The Platforms
| Feature | Langsmith | Helicone | W&B Weave | Langfuse | PromptLayer |
|---|---|---|---|---|---|
| Ease of Integration | SDK | Proxy/SDK | SDK | Proxy/SDK | SDK |
| Monitoring Depth (Tracing) | High | Medium/High | High | High | Medium |
| Cost Tracking Granularity | Medium | High | High | High | High |
| Experimentation/Eval | High | Medium/High | Very High | Very High | High |
| Dataset Management | High | Medium | High | High | Medium |
| UI Prompt Mgmt (No-Code) | Yes | Yes | Unclear/Likely No | Yes | Yes (Core Strength) |
| Open Source Option | No | Yes | Yes | Yes | No |
| Key Strengths | LangChain integration; Balanced | Ease of integration; Cost control; Open Source | Robust evaluation; MLOps integration | Open Source; UI Prompt Mgmt; Balanced | UI Prompt Mgmt; Visual workflows |
Selecting the right platform involves weighing features, integration effort, cost, and how well it fits your team’s specific situation. Here are some key trade-offs you will want to consider:
- Open Source vs. Closed Source: Helicone and Langfuse offer open-source versions. This gives you potential cost savings via self-hosting, more data control, and avoids vendor lock-in. The trade-off is the technical overhead of setting up, maintaining, and scaling it yourself. Closed-source, managed cloud options (Langsmith, W&B Weave, PromptLayer) offer convenience and support but come with subscription fees and less control. You need to balance the desire for control/savings against operational resources.
- Ease of Integration: How quickly can you get value? Helicone’s proxy approach is near-instant. Langsmith is very easy if you’re already using LangChain. SDK-based integrations (common to most) require more code but offer flexibility. OpenTelemetry support provides standardisation but involves its own setup. Consider your team’s skills and how fast you need to get observability in place.
- Breadth vs. Depth: W&B Weave offers the broadest scope, embedding LLM observability within a full MLOps platform – powerful, but maybe overkill if you only need LLM tooling. PromptLayer goes deep on prompt management and visual workflows, perhaps with less emphasis on deep tracing than others. Langsmith and Langfuse offer a strong balance across tracing, evaluation, and prompt management. Helicone focuses tightly on core observability, cost, and ease of use. Identify your biggest pain point (debugging? prompt iteration speed? evaluation rigor? cost?) and align the platform’s focus accordingly.
- Pricing Models: Understand the costs. Per-user models are predictable by team size but can get pricey. Usage-based components (traces, requests, events, data ingestion) need careful estimation – W&B Weave’s ingestion cost, in particular, can be hard to predict. Free tiers are great for trials but often have limitations (users, retention) making them unsuitable for full production. Model your expected usage to compare the total cost of ownership (TCO).
- UI Prompt Management: The ability to manage and deploy prompts via a UI without code changes is a major accelerator for iteration and collaboration. Langfuse, PromptLayer, Helicone, and Langsmith provide this clearly. If rapid prompt iteration involving non-engineers is key, prioritise platforms strong in this area.
Ultimately, there’s no single “best” platform. The optimal choice depends heavily on your context: your main challenges, budget, team skills, existing tools (especially LangChain), and the strategic importance you place on features like open-source or UI-driven prompt deployment.
Get Your Agents Production-Ready
Developing and deploying LLM agents can feel like two different worlds: the initial build can feel straightforward, but achieving consistent, reliable, and cost-effective performance in production is a complex engineering challenge.
But that challenge can be navigated with the right platform. Find the one that fits your needs, integrate it into your process, and you can start optimising your Agents today.
Which of the top 5 AI coding assistants is right for you?It has become clear to everyone in tech that AI coding assistants have reached the point where adoption is a necessity. Developers can use these assistants to boost productivity across their development process, to integrate unfamiliar services, and even to navigate complex services with deep feature sets like AWS and Google Cloud Compute.
How much of a productivity boost these code assistants will give you depends on your developers, how common your tech stack is, and how common your product feature set is.
Building a restaurant recommendation site using React? AI will scaffold and draft your frontend and backend code.
Implementing novel trading algorithms on top of your bespoke low-latency networking stack? AI will still boost your developers’ effectiveness.
One team Cline highlights on its blog used its open-source agent to 5× their productivity, allowing them to tackle features at a speed a team their size shouldn’t be capable of reaching.
Cursor reports similar gains when developers lean on its Composer agent for multi-step refactors inside its VS Code-fork IDE, while Copilot’s new Agent Mode shows Microsoft isn’t going to be left behind in the feature parity race.
Choosing the right AI coding assistant your business should settle on isn’t straightforward. Your business priorities and requirements need to guide the decision. Beyond platform integration, model flexibility, and pricing, you need to weigh open-source versus closed platforms, whether you want per-seat or credit-pool billing, and how much administrative control you need (SSO, RBAC, usage analytics, fine-grained model policy). The market shifts weekly, so every feature in this roundup reflects the tools’ states as of April 2025.
The Five Assistants at a Glance
We’ll focus on GitHub Copilot, Cursor, Windsurf, Cline and Roo Code. All of these revolve around Microsoft Visual Studio Code. Copilot is built into it by Microsoft. Windsurf and Cursor are forks of VS Code, while Cline and Roo Code are VS Code extensions.
Administrative Management and Control
Except for the FOSS Roo Code, all the coding assistants are business and enterprise ready, with Cline offering such features in Q2 2025.
Of course SSO is available, and on top of that they each provide different methods for managing seats and costs.
Naturally Microsoft – they live and breathe enterprise – lead the way with GitHub Copilot’s admin features.
- GitHub Copilot (Enterprise tier) leads on enterprise governance: a full admin dashboard, org-wide usage analytics, SAML SSO, centralized billing, and RBAC for both features and model families. Admins can disable overage billing or restrict certain models with a toggle.
- Cursor (Business / Enterprise) matches most of that stack—dashboard, SAML/OIDC SSO, spending caps—but exposes fewer model policies because users can also bring their own keys.
- Windsurf offers a dashboard and RBAC in its Teams/Enterprise editions, but model choice is admin-only and SSO is an add-on for smaller teams.
- Cline plans team dashboards, RBAC, and SSO in Q2 2025; today you manage users through normal VS Code tooling and rely on your LLM provider’s console for spend tracking.
- Roo Code skips formal admin features entirely; teams rely on its “Custom Modes” JSON files for lightweight per-workspace policy.
Understanding Pricing and Cost Management
| Tool | Core Plan | Billing Model | Overage / Credits | Free Tier |
|---|---|---|---|---|
| Copilot Business | $19 user/mo | per seat | $0.04 per premium request | yes |
| Cursor Business | $40 user/mo | per seat + optional usage | slow queue or per-request billing after 500 fast calls | yes (trial) |
| Windsurf Teams | $30 user/mo | credit pack per seat | add-on credit purchases | yes (limited credits) |
| Cline | Free extension | BYOK or Cline Credits | external provider rates | yes |
| Roo Code | Free extension | BYOK | N/A | Free to run local models |
Copilot’s predictable seat price suits companies that value budget certainty over raw flexibility. Cursor mixes the two models: 500 premium calls are bundled, after which the org decides whether requests throttle or start metered billing. Windsurf decouples usage entirely with credits—great for bursty workloads, but something finance teams must watch. Cline and Roo Code shift every dollar to your own LLM account (OpenAI, Anthropic, Google, Azure, or local via Ollama/LM Studio); no assistant invoice appears at all.
Spending safeguards differ too. Cursor’s dashboard lets admins set a hard USD cap, while Copilot limits you to on/off overage flags. Windsurf currently requires manual top-ups; Cline and Roo Code inherit whatever alerts your LLM vendor provides.
Technical Capabilities and Features
| Capability | Copilot | Cursor | Windsurf | Cline | Roo Code |
|---|---|---|---|---|---|
| Default model availability | GPT-4o, Claude 3.7, Gemini 4 | GPT-4o, Claude Opus, Gemini 2.5 | GPT-4.1, Claude 3.7, Gemini 2.5 | none | none |
| BYOK keys | Yes | OpenAI, Anthropic, Google, Azure | no | Yes | Yes |
| Core agent | “Agent Mode” | “Composer” | “Cascade” + “Flows” | “Plan/Act” | “Custom Modes” |
| File read/write | limited | full | full | full | full |
| Terminal exec | CLI/Ext | built-in | built-in | built-in | built-in |
| Browser automation | limited | limited | preview automation | full | Full |
| MCP Support | Yes | Yes | Yes | Yes | Yes |
Copilot’s strength is breadth: IDEs, CLI, GitHub Mobile, and GitHub.com all surface the same models and repository-wide context. Cursor and Windsurf embed AI deeper into a VS Code-derived IDE—Cursor favoring code intelligence and Windsurf emphasizing its Cascade workflow engine that strings agents into repeatable “Flows.” Cline and Roo Code expose the richest automation (browser control, shell commands, diff checkpoints, MCPs) but leave reliability up to the quality of the LLM you plug in.
Integration and Extensibility Options
- Copilot Extensions now forms its own marketplace, and admins can pre-approve or ban specific extensions.
- Cursor inherits the entire VS Code extension ecosystem plus an MCP bridge, so your existing tooling usually “just works”. However, Microsoft is starting to block the VS Code extension marketplace, as it was never included in the Open Source version of VS Code that Cursor is a fork of. But there is an open source VS Code extension marketplace
- Windsurf also supports VS Code extensions and has native MCP support for tool chaining. Like Cursor, it is also vulnerable to Microsoft enforcing VS Code extension marketplace access.
- Cline and Roo Code treat MCP as a first-class primitive: agents can spin up custom tools on the fly, a powerful way to script internal services without waiting for the vendor. Note: As these are VS Code extensions, not VS Code forks, they are not currently affected by Microsoft policy changes.
Open-source posture matters here. Cline’s Apache-licensed repository lets enterprises audit and fork the agent; Roo Code is a community-run fork of Cline that layers “Custom Modes” for per-task defaults (model, temperature, tool set). Copilot, Cursor, and Windsurf sit on closed back ends even though they reuse the VS Code OSS editor.
Real-World Implementation Examples
For that 10-developer team needing simple user management:
- All-in on GitHub? Copilot Business at $19 per seat ($190 mo) is the cleanest fit, with GitHub org admins handling SSO and spend tracking. Comes with unlimited calls to OpenAI’s GPT-4.1, one of the current top coding models, thanks to Microsoft self-hosting it on Azure.
- VS Code power users? Cursor Business costs $800 mo but bundles 5000 fast premium calls before throttling—often enough if your team leans on autocomplete more than chat agents. You will spend much more, much much more, if you lean into Agent mode to accelerate development.
- Automation-hungry? Windsurf’s $1 500 mo plus credit packs enables its Cascade flows to auto-triage test failures or run Netlify deploys, but finance must keep credit top-ups in check.
- Privacy-critical org? Cline with self-hosted Llama 4 or DeepSeek behind your firewall costs nothing beyond GPU time; you’ll wait for Q2 2025 to get enterprise dashboards.
- Pro-Open Source and want full control? Roo Code’s flexibility (BYOK with SOTA models plus local model access) gives you full control over spending and workflows.
Detailed Platform Comparisons
GitHub Copilot
Still the go-to for teams living in GitHub issues, pull requests, and Actions. Its new Copilot Extensions layer brings first-party hooks into CI pipelines and popular SaaS tools, all constrained by org-level policies. The Enterprise tier ($39 user/mo) unlocks codebase indexing and granular usage analytics, plus SAML SSO.
Cursor
A polished AI-native IDE forked from VS Code OSS. Composer mode plans multi-file edits, runs tests, and can slow-queue requests after the 500-call allowance to avoid surprise bills. Admins set per-org dollar caps and see who is burning through the tokens; users can override built-in models by pasting their own OpenAI, Anthropic, Google, Azure or AWS Bedrock keys.
Windsurf
Targets advanced automation. Cascade agents chain LLM calls, and “Flows” save those chains for reuse—think one-click bug-to-fix pipelines. Live Preview panes and Netlify deploy hooks help full-stack teams.
Cline
Open-source VS Code extension with Plan/Act modes, full file I/O, terminal, and browser tools. MCP integration means agents can pull logs, query databases, or hit internal and external APIs seamlessly. Everything runs on your BYOK keys (or local models), keeping code inside your network. Team features land later this year.
Roo Code
Community fork of Cline that adds “Custom Modes.” A mode bundles default prompts, temperature, and model choice, letting teams create presets like “Architect Mode” for design docs or “Debug Mode” for stack traces. No dashboards or billing—usage is whatever your LLM vendor meters.
Business Scenarios and Tool Selection
Depending on your business needs you’re going to want to look at specific tools first. All the tools are rushing towards feature parity, so the choice comes down to your priorities:
- Single-platform simplicity: Copilot for GitHub-centric orgs; budgeting by headcount.
- Flexibility without self-hosting: Cursor balances seat pricing with admin spending caps and user-supplied keys.
- Cutting-edge automation: Windsurf if you can actively manage Blazes and don’t mind rapid UI changes.
- Data-sovereign enterprises: Cline or Roo Code when self-hosting or local inference is mandatory.
- Experimental or heterogeneous teams: Mix tools. Main product devs on Copilot, research on Roo Code, security on Cline with private models.
Making the Right Choice for Your Business
Match the assistant to the workflows you already have, the governance you require, and the budget model you can stomach. Re-evaluate every quarter; model quality, pricing, and features shift fast. A structured pilot to see what works, clear cost controls, and incremental rollout is the standard path to onboarding AI coding assistants without disrupting your delivery cadence.
Looking to the Future of AI-Assisted Development
GitHub Copilot continues to deepen GitHub-native workflows, Cursor pushes the VS Code envelope, Windsurf experiments with agentic pipelines, and the open-source duo of Cline and Roo Code keeps customisation and data privacy on the table. Choose deliberately, test rigorously, and keep an eye on the market, because in six months, maybe even three, the “top five” might look different again.
Here’s the 80/20 Security Checklist Your Business Needs to UseCyber security is only going to get tougher. That’s one of the “benefits” of the AI wave we’re in. But there are things you can do to reduce risk – thousands of things.
But here’s a list of the quick wins you can implement that will bring you the biggest step changes to your risk profile – the 20% effort that will bring you 80% of the benefit. And most of them are set once or automated or only require periodic check-ups.
1. Locking Down Access and Authentication
Unauthorized access is still a primary path attackers use to get inside. Strong authentication and tight access controls are your foundational defences.
Turn On Multi-Factor Authentication (MFA)
- What: Activate MFA on all important business accounts.
- Why: This directly stops attacks that rely on stolen or weak passwords (like phishing, credential stuffing, brute-force). Adding that second check makes it much harder for attackers to take over accounts, even if they have the password.
- How: Prioritise MFA for email (Microsoft 365, Google Workspace), banking, cloud platforms (AWS, Azure, GCP), VPNs, and all admin accounts. Use authenticator apps (Google Authenticator, Microsoft Authenticator, Okta Verify) over SMS whenever possible, as they’re generally more secure. Follow best practices outlined in the Australian Cyber Security Centre (ACSC)’s MFA guidance.
- Tools: Many platforms offer built-in MFA. For broader control, consider Identity and Access Management (IAM) solutions:
Use Strong, Unique Passphrases & a Password Manager
- What: Require long, unique passphrases for every single account, and use a password manager to handle them.
- Why: Stops attackers from easily guessing weak passwords or using credentials stolen from one breach to access other unrelated accounts (credential stuffing).
- How: Set a minimum passphrase length of 14 characters; using 4+ random words is a good technique. Roll out a solid business password manager to generate, store, and fill strong credentials securely. Make sure the manager itself is locked down with a strong master passphrase and MFA. Train your team on using it properly. Check the ACSC’s advice on passphrases.
- Tools: Look at well-regarded password managers with strong security:
Apply the Principle of Least Privilege (Limit Admin Rights)
- What: Tightly control and minimise who gets administrator privileges.
- Why: Radically reduces the damage if an account gets compromised. If a standard user account is breached, the attacker’s reach is limited, preventing system-wide damage compared to when an admin account is hit. It also makes privilege escalation attacks harder.
- How: Give users only the permissions they absolutely need for their job. Use separate, dedicated accounts for admin tasks – never use an admin account for everyday things like email or Browse. Review admin rights regularly. This lines up with the ‘Restrict Administrative Privileges’ strategy in the ACSC’s Essential Eight.
Manage Staff Access Changes Swiftly
- What: Have solid processes to immediately remove access for people leaving the company or changing roles.
- Why: Stops potential data theft or system misuse by former employees (an insider risk) and cleans up unused accounts that pose a lingering security risk.
- How: Make sure your HR off-boarding and role-change processes directly trigger IT access removal. Disable accounts and revoke permissions right away. Run regular checks on active user accounts to find and disable any orphaned or unnecessary ones.
2. Setting Up Robust Data Protection
Protecting your business and customer data is vital for keeping the lights on, meeting legal duties, and holding onto your reputation.
Set Up Regular, Automated Data Backups
- What: Run frequent, automated backups of all data that’s critical to your business.
- Why: Gives you a way to recover data and get back to business after major disruptions like ransomware, hardware meltdowns, accidental deletions, or even fires and floods.
- How: Pinpoint your critical data (financials, customer lists, operational files, system configs, cloud data like M365 backups – check provider options). Set up automatic daily backups using dependable backup software or services. This is a key part of the ACSC Essential Eight’s ‘Regular Backups’ strategy.
- Tools: Look into business-grade backup solutions:
Keep Backups Separate and Test Your Restores
- What: Store backup copies somewhere separate (physically or logically) from your live data, and regularly test that you can actually restore from them.
- Why: Stops your backups from being wiped out by the same attack (especially ransomware) that hits your main systems. Untested backups might fail you when you need them most.
- How: Follow the 3-2-1 rule: at least 3 copies of data, on 2 different media types, with 1 copy offsite. For extra ransomware defence, make sure one copy is offline (air-gapped) or immutable (can’t be changed – via cloud storage with products like AWS S3 with Object Lock, Azure Blob Storage, and Google Cloud Storage with Bucket Lock). Schedule regular restore tests (maybe quarterly) to prove the backups work and your team knows the drill.
Secure Customer Information (Privacy Act Compliance)
- What: Know and meet your obligations for handling personal information under the Australian Privacy Act 1988.
- Why: Helps prevent costly data breaches involving customer info, keeps you compliant with the law, protects your reputation, and avoids fines.
- How: Only collect the personal data you actually need. Store it securely using good technical controls (encryption, access controls). Use secure methods for any transactions. Have a clear, easy-to-find privacy policy. Check guidance from the OAIC.
3. Keeping Systems Healthy and Networks Secure
Updated, well-configured systems and networks are fundamental defences.
Patch Software and Operating Systems Quickly
- What: Regularly apply security patches and updates for all your software and operating systems.
- Why: Closes security holes that attackers know about and actively try to exploit. Patching quickly shuts these doors before attackers get in.
- How: Turn on automatic updates where it makes sense. Jump on patches for known exploited vulnerabilities fast, especially for systems facing the internet (aim for under 48 hours). Get other critical patches done promptly (e.g., within weeks). Get rid of any software or OS versions that are no longer supported and don’t get security updates. This directly supports the ACSC Essential Eight’s ‘Patch Applications’ and ‘Patch Operating Systems’ strategies.
Use and Maintain Endpoint Security Software
- What: Install, configure, and keep up-to-date endpoint security software (like Endpoint Detection and Response (EDR) and Endpoint Protection Platform (EPP) including antivirus/anti-malware) on all computers, servers, and work mobile devices.
- Why: Provides defence against malware like viruses, trojans, ransomware, and spyware by spotting and blocking known threats. Modern EDR tools also help catch new threats and give you tools to respond.
- How: Use solid built-in tools (like Microsoft Defender for Endpoint) or pick trusted third-party options. Make sure the software is always on, updating its threat intelligence constantly, and configured correctly.
- Tools: Top players in endpoint security include:
Secure Your Office Wi-Fi and Router
- What: Lock down the basic security settings on your office wireless network and internet router.
- Why: Stops outsiders from jumping onto your network, listening in on wireless traffic, or using your internet connection for shady activities.
- How: Change the router’s default admin password immediately. Use strong Wi-Fi encryption (WPA2 minimum, WPA3 preferred) with a strong passphrase. If you offer guest Wi-Fi, put it on a separate, isolated network. Check ACSC advice for network security.
4. Managing Cloud and Third-Party Risks
Using external services means managing the security risks that come with them.
Use MFA and Secure Configurations for Cloud Services
- What: Mandate MFA for all cloud service access (SaaS, PaaS, IaaS) and make sure you understand and apply basic secure setup within those platforms.
- Why: Protects your cloud accounts and data from being accessed by attackers with stolen credentials. Also tackles the common problem of data exposure due to simple cloud misconfigurations.
- How: MFA for cloud access isn’t optional. Understand the Shared Responsibility Model for each service – the provider secures the base infrastructure, you secure your data, users, and how you configure things inside the service. Apply essential settings like tight access controls, correct permissions, and logging within your cloud platforms. Use the ACSC’s cloud security guidance.
Be Smart About Third-Party Providers
- What: Do some basic security checks on your key suppliers, especially if they handle your sensitive data or provide critical IT functions (like IT support, payroll, SaaS tools).
- Why: Reduces your supply chain risk – where a security slip-up at your vendor becomes your problem, potentially leading to a breach impacting you.
- How: Ask potential vendors about their security practices before you sign up. Make sure contracts clearly spell out security duties, how data will be handled, and what happens if they have a breach.
5. Empowering Your People and Preparing for Incidents
Much of your tech defences can be automated, but your team and your preparedness plan are a big part of your business’s security resilience.
Train Your Staff on Security Fundamentals
- What: Run regular, practical security awareness training for everyone.
- Why: Cuts down on security incidents caused by human mistakes, like clicking phishing links, falling for Business Email Compromise (BEC) scams, or accidentally installing malware.
- How: Focus training on real-world skills: spotting suspicious emails/links, password safety, safe Browse, and recognizing common scams. Keep it short, regular, and interesting. Use resources available from the ACSC. Build a culture where people feel safe reporting anything suspicious.
- Tools: Consider security awareness training platforms:
Have a Simple Incident Response Plan
- What: Create a clear, straightforward plan for what to do if you suspect a cyber incident.
- Why: Helps you react faster, stay calmer, and respond more effectively during a crisis, which minimises the damage, downtime, and cost. Being prepared prevents panic and leads to better decisions.
- How: Your plan should list: key internal contacts (IT, management), first steps for containing the problem (like isolating machines if possible), where backups are and how to restore them, and essential external contacts (cyber insurance, legal, ACSC hotline: 1300 292 371). Keep a printed copy somewhere safe – your network might be down when you need it.
Set Up Clear Incident Reporting Channels
- What: Make sure every employee knows who to tell internally if they see something suspicious or think an incident might be happening.
- Why: Allows for quick internal action to stop a potential threat. Also ensures serious incidents get reported externally to the right places (like the ACSC via ReportCyber) when required, helping everyone by improving threat intelligence and potentially involving law enforcement.
- How: Define a clear internal reporting point (e.g., their manager, IT helpdesk, security contact). Make sure relevant people know about the ACSC’s ReportCyber portal for reporting incidents affecting the business.
Lock those cyber doors
By implementing these security measures, your business establishes interlocking defences against common cyber threats. This protects your operations, your data, and your reputation.
The list is pretty much in order of priority. We’d recommend starting on 1 and 2 today, then keep working your way down through every item. Once everything is in place security will become second nature to your team.
Using AI to Build Big Products on Tight BudgetsAll you have is $50,000 in seed funding, a vision for a niche marketplace product, and six months to turn that into something users will pay for. You’re going to keep it simple and aim for the widest availability: web-based with a mobile-first design.
By standard development metrics, where projects need teams of 5-8 people, this combination of budget and timeline looks unworkable.
You need to build and launch a market-ready product with what typically covers just the design phase of a development project. This is a constant in business – you can’t afford and can’t afford to wait for the perfect team and the perfect circumstances.
To achieve this “vision” you’ll need to rethink how you approach product development. The standard process of separate design, development and testing phases won’t work when your runway looks like it is measured in weeks instead of months.
This isn’t about coding or features. It’s about finding what users will pay for and building it fast. You have to make every development hour count towards getting a product that can start making money.
Four Key Development Strategies For Success
Here’s how to build a market-ready product on a tight budget. It comes down to combining four approaches that speed up getting to revenue.
The first approach uses Lean Startup to focus on learning what works and cutting anything that doesn’t move you towards revenue. The second replaces the basic MVP with a Minimum Marketable Product (MMP) – something users will pay for from day one. The third uses a small nearshore team of 1-3 developers who can work through Lean cycles quickly while keeping costs manageable. The fourth uses AI tools for coding, design and testing to multiply what that small team can achieve.
These four elements let you launch a product that makes money while you learn what your market wants.
Maximising Development Efficiency Under Constraints
Here’s how those four components work together to get you to a product users will pay for. The first piece is building a Minimum Marketable Product (MMP) – something simple that delivers value from day one. Think of a subscription management app that just handles payments and user access. No bells, no whistles.
The second and third pieces work hand in hand. You need a small nearshore team of 1-3 developers.. One developer handles the UI/UX and testing while the others work across the full stack. And they use AI coding assistants like Cursor, GitHub Copilot and Windsurf to speed up their work – code completion to write faster, AI-generated tests to catch problems, and specialised UI and UX tools like Uizard to draft initial designs.
The fourth piece, Lean-focused Agile development, ties it all together with two-week development cycles. Build something, see how users respond, adjust based on that response. Then do it again. Each cycle moves you closer to what your market wants.
Budget Planning And Team Structure
Let’s talk about how that $50,000 gets spent across six months. Most of it goes to your development team – they build your product. The cost of a nearshore team depends on where they’re based, their skill level, and how many people you need. It also depends on what you’re building and what technology you’re using to build it.
You need to understand these costs to work out how many developers you can afford and for how long.
Implementation Timeline And Technical Setup
Here’s the basic timeline for turning that $50,000 into something users will pay for.
The first two weeks are about getting the technical foundations right. You can use AI to assist with this. There are different techniques and strategies still being worked on as these tools continue to evolve.
You and your team define what features go into the MMP and map out how users will move through the product. They build the UI designs for the parts of your product that will generate revenue.
As part of that process, they set up the software architecture and get the version control and project management tools running. If you’re using AI tools to speed up development, this is when they get set up and tested. By the end of week 2, you have a technical plan and everything in place to start building features.
Measuring Product Market Fit And Performance
So now your team is heads down building. The goal is to get a product you can launch and users can start interacting with and responding to as quickly as possible.
Once you launch, you need to stop building and start measuring what your users do. Your product will only work if users pay for it, so you need to know what they’re doing and what they think about what you’ve built. This means tracking four metrics that tell you if users find value in your product.
- Daily/Weekly/Monthly Active Users – shows you if users are coming back
- Customer acquisition cost – shows the efficiency of your marketing and sales efforts
- Revenue per user – indicates how effectively you’re monetising your product
- Churn rate – reveals whether you’re delivering enough value to retain users
By tracking these metrics you get a concrete picture of your product’s performance. And naturally you’ve instrumented your app so you know what features are being used and what features aren’t.
This is also the time you reach out to users and get direct feedback on their experience with your app.
Combining these information sources shows you where to focus your development budget on changes that move you towards revenue.
Managing Development Risks
Using a lean approach with a small team keeps costs down but comes with three risks you need to manage.
The first is technical debt. Set up a simple system to log when you take shortcuts to hit deadlines, then schedule time to clean up that code.
The second is budget monitoring. Your $50,000 can disappear fast when developers hit complex problems or need extra time to learn new tools, so check spending weekly.
The third is scope creep. If you’re running solo, then it’s all about being very judicious about implementing any features that users request. If you have stakeholders, once they see the product taking shape and getting a foothold among users, they’ll have features of their own they’ll want to see implemented, and they will be harder to turn down than users.
Keep a list of requested features but stay focused on building what users will actually pay for.
The nearshore team benefits
Using a small, nearshore team supported by AI dev tools lets you build a product faster and cheaper than traditional development approaches. You get access to a bigger talent pool while keeping costs under control and you can adjust your team size as needed.
The model works because you’re working with established providers with experienced developers. As more and more businesses move towards core teams augmented with team extensions, the developers at the extended team providers are the ones building up experience across multiple projects and technologies.
Making It Happen With What You’ve Got
Building a market-ready product with limited resources isn’t about having the perfect tech stack or a big team – it’s about ruthlessly focusing on what generates revenue. By combining Lean principles, a revenue-focused MMP and a small nearshore team supported by AI development tools, you can turn $50,000 and six months into a product users will pay for. This approach trades the comfort of large teams and long timelines for the reality of getting to market quickly with something that can sustain itself through revenue.
If you’re sitting on a product idea but don’t have the typical development budget, don’t let that stop you. Start by defining your MMP – what’s the simplest thing users will pay for? Talk to a few potential users. Confirm they’re willing to pay.
Then come and have a chat with us. Our passion is helping businesses punch above their weight in software product development. We’re always happy to talk about the strategies and costs of building software, so get in touch.